
Are you making money on all of your jobs? Do you know which of your jobs are making money-and which are not? Here are some tips that will help you set up and start using job costing in QuickBooks: Premier Contractor Edition today.
 Insufficient job costing is an all-too-common cause of failure among contractors. If you're not using accurate job costing in your business, you may be making a costly mistake. In fact, you could be losing thousands of dollars on each job. Insufficient job costing is an all-too-common cause of failure among contractors. If you're not using accurate job costing in your business, you may be making a costly mistake. In fact, you could be losing thousands of dollars on each job.
With the job costing tools in Premier Contractor Edition, you can see exactly how much money you spent—and made—on each of your jobs. You won't have to wait until you do your taxes at the end of the year to see if your business is operating in the red or the black. Plus, you'll be able to see which types of jobs are winners and which are losers, so you'll know which jobs to take in the future.
Job costing in the Premier Contractor Edition can also help you estimate more accurately. Almost every contractor would agree that estimating is the most important—and most difficult—part of the business. But unless you compare your estimated costs to your actual costs after the work is complete, you have no way of knowing if you are estimating high, low or right on, and no way of improving your ability to estimate in the future. Your Premier Contractor Edition makes it easy for you to compare estimated costs to actual costs by job or even by item.
The good news is that doing job costing in Premier Contractor Edition is fast and easy. In fact, you're probably already entering most, if not all, of the information you need into QuickBooks. Use the following five easy steps to start job costing today.
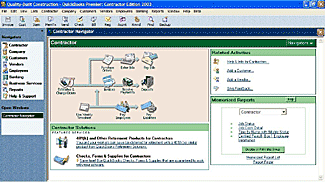
To do job costing, you need to set up a Customer:Job for each of your jobs. You're probably doing this already, but if not, make sure you complete this essential—and quick—step. To add a new customer, click on "Add a Customer" in the Related Activities section of the Contractor Navigator.
 Create invoices in Premier Contractor Edition and select the right Customer:Job. Again, you're probably already doing this step, too. If you create your invoices outside of QuickBooks, make sure that you enter at least a summary of each invoice into QuickBooks so that the revenue is included in QuickBooks job profitability reports. Create invoices in Premier Contractor Edition and select the right Customer:Job. Again, you're probably already doing this step, too. If you create your invoices outside of QuickBooks, make sure that you enter at least a summary of each invoice into QuickBooks so that the revenue is included in QuickBooks job profitability reports.
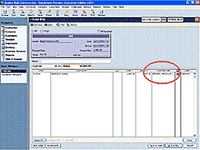
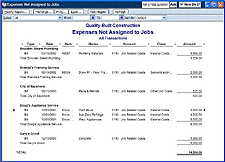
Assign all expenses to jobs. While you may be assigning some expenses to Customer:Jobs, the key is to get all of your expenses and revenue assigned to jobs, so you can see the complete picture. Fortunately, QuickBooks makes this incredibly easy. Every time you enter a bill, check or timesheet, make sure you select the appropriate job(s) in the Customer:Job column. That's all you have to do and QuickBooks will do all of the math for you. (Note: The Expenses Not Assigned to Jobs report discussed in Step 5 below will help you double-check and ensure that you haven't missed any expenses.)
 Additional tip: Overhead expenses, such as rent and supplies for your office, are not caused by any specific job and, therefore, should not be assigned to a Customer:Job. However, some QuickBooks users still like to see these expenses on job costing reports. In order to do that, create a "dummy" Customer:Job called "Overhead" and then assign all of your overhead costs to that fake job. Additional tip: Overhead expenses, such as rent and supplies for your office, are not caused by any specific job and, therefore, should not be assigned to a Customer:Job. However, some QuickBooks users still like to see these expenses on job costing reports. In order to do that, create a "dummy" Customer:Job called "Overhead" and then assign all of your overhead costs to that fake job.
Enter your estimates in Premier Contractor Edition. While you can stop at Step 3 and start using the job costing reports in QuickBooks, you'll benefit much more if you include estimates in your job-costing reports. By entering estimates into QuickBooks, you can compare your estimated costs to actual costs to see where you're estimating too high or too low. With that critical information, you can estimate more accurately in the future so you will make more money from each job and win more jobs.
 If you currently create estimates outside of QuickBooks, either by hand or by using a simple spreadsheet, don't worry—you don't need to change your familiar processes. You can continue to use your existing estimating procedures. All you need to do is enter a summary of your estimate--even just a single line--into QuickBooks. Note, however, that the more detail you enter in QuickBooks, the more thorough your reporting will be. If you currently create estimates outside of QuickBooks, either by hand or by using a simple spreadsheet, don't worry—you don't need to change your familiar processes. You can continue to use your existing estimating procedures. All you need to do is enter a summary of your estimate--even just a single line--into QuickBooks. Note, however, that the more detail you enter in QuickBooks, the more thorough your reporting will be.
Some contractors create estimates outside of QuickBooks, but create invoices in QuickBooks. If you're one of those contractors, you're in luck. You're already entering all the information you need into QuickBooks-you just need to enter it a little bit differently. Enter your invoice using the Create Estimates window. Then, you can automatically convert that into an invoice using the "Create Invoice" button on the top of the Estimate window.
The Estimate form in QuickBooks works just like the Invoice form. To find the Estimate form, click on "Estimates & Change Orders" on the Contractor Navigator.
 Use job costing reports in QuickBooks. You've now given QuickBooks all the information it needs to create incredibly valuable job costing reports for you. The reports will display all the vital information by job that you've been collecting all along. By using these reports, you can determine which jobs are making money and which ones are losing money, based on the actual revenue and costs associated with each job. Premier Contractor Edition has 13 different Job Costing reports. Use job costing reports in QuickBooks. You've now given QuickBooks all the information it needs to create incredibly valuable job costing reports for you. The reports will display all the vital information by job that you've been collecting all along. By using these reports, you can determine which jobs are making money and which ones are losing money, based on the actual revenue and costs associated with each job. Premier Contractor Edition has 13 different Job Costing reports.
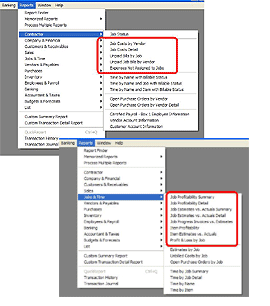 To run the reports and learn more about the information stored in each report, go to: To run the reports and learn more about the information stored in each report, go to:
- Reports menu > Contractor
 or or
- Reports menu > Jobs & Time
You can also use the handy Report Finder, which gives you a sample and a brief description of each report.
Some of the most important Job Costing reports in Premier Contractor Edition include:
- Job Profitability Summary / Detail: These reports give you a snapshot of your jobs so you can see which jobs are making money—and which are not. The Summary report shows revenue, cost and profit for each of your jobs. The Detail report drills down into a job showing revenue, cost and profit by item within the job.
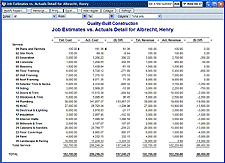
- Job Estimates vs. Actuals Summary / Detail: Use these reports to see how accurate your estimates are and to improve your future estimates. This is the most important use of job costing information! The summary report compares estimated costs and revenues to actual costs and revenues for all of your jobs. If you see a big variance on a job, use the Detail report to compare estimated costs and revenues to actual costs and revenues by item within the job.
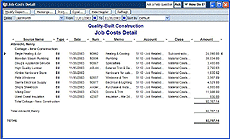
- Job Costs Detail: You can use this report to analyze your expenses for each job and look for opportunities to reduce costs. Lower costs lead to higher profits as well as more jobs because you can underbid your competitors.
- Expenses Not Assigned to Jobs: Use this report to find any expenses in QuickBooks that have not been assigned to a Customer:Job. That helps you ensure that your job costing reports will be complete and accurate. If you do time and material invoicing, this report is even more important. You can use it to make sure that you don't forget to invoice your customers for any expenses.
- Job Costs by Vendor: Summarize billings from all of your materials suppliers and subcontractors. See if you're relying too heavily on any one vendor. Use this information to negotiate better pricing or terms from your biggest vendors.
- Unpaid Bills by Job and Unpaid Job Bills by Vendor: These reports show what you owe to vendors, grouped by vendor or by job. Use these reports to manage your cash flow and make sure you pay your bills on time.
By using job costing, you'll have a solid grasp of the profitability of each job as well as the overall state of your business. You'll be able to predict the financial outcome of jobs and make adjustments accordingly as the job progresses. You'll quickly discover that using job costing is one of the smartest ways to improve your finances and boost your company's profits.
|